Wednesday, December 22, 2010

Naughty but Nice Greens


Now, I am not a fool and I know it's not easy to get people to eat cabbage with a little more cabbage. This is more for what to do with those Sunday roast left overs. I loath throwing anything out and this can be served as a side, or if you are like me and cooking for one this week, then you get the whole thing to yourself. 

There aren't really any measurements to this, just throw what you have together:
Brussel sprouts - cooked and halved
Savoy cabbage - cooked in strips
Chicken skin - use about one leg's worth of skin for every ten sprouts used - this should be taken from a roasted chicken or any left overs
Block of parmesan
Extra virgin olive oil
Salt and pepper

Cut the skin into thin strips. Heat a little oil in a frying pan and when hot add the skin. You want the pan to be quite hot so the skin will start popping and the oil will help render the fat from the skin.

When the skin starts to look crispy add the sprouts and cabbage (and any small shreds of chicken you didn't quite finish the first time around). Season according to how the veg were cooked originally, add a little more salt and pepper if you feel it needs it. Cook for a further 5-7 minutes until the sprouts start to get some colour and they have heated through nicely.

Serve immediately with some parmesan shavings and a good drizzle of extra virgin oil.

Tuesday, December 21, 2010

Gingerbread House

This is something that has been made in my house ever since I was big enough to appreciate candy. My lovely mother has always been gracious enough to put it together, only for one of us to smash it with a rolling pin (my brothers preferred baseball bats) after Christmas. Now that I am old enough to handle boiling sugar, my sister and I have now picked up the gauntlet and have begun creating it ourselves. Have patience with the length of this piece there are several components that need to be described!

Please excuse the odd measurements, this is how the recipe is given in a 1960s Norwegian cookbook - dutifully translated by a Mrs. Laila Smith.
This is a base for the gingerbread house and to make about 100 figurines

Ingredients:
150g (two thirds of a cup) unsalted butter, softened
500 ml caster sugar
200ml golden syrup (it is hard to find a U.S. alternative for this, but light corn syrup is probably the closest thing)
200ml cold water
1 tbsp cinnamon
1 tbsp ginger
1 tbsp ground clove
1 tbsp baking soda
1.5 litres plain flour
a further 100ml of plain flour

To decorate:
A selection of coloured boiled sweets
half a cup of Caster sugar
Icing sugar

I like to use white chocolate buttons to decorate the roof with but you can use anything your heart desires, you can even just use icing sugar if you wish, or make small tiles out of royal icing.

Cream the butter, sugar and syrup together until white. Add the water, spices and baking soda then begin to work in the flour. Divide the dough in half and add the extra 100ml of flour to one half. Knead each dough on a floured surface to combine and evenly distribute spice. Wrap in cling film and keep in a cold place over night.
Now comes the fun part:

For gingerbread men etc. roll the dough out until a couple of mm thick. Cut out whatever shapes you wish and place in a preheated fan oven at 180 C/350 F for 5-7 minutes. Be careful to watch them because they can go from golden to charred very quickly. Place them on a cooling rack straight away otherwise they will continue to cook (I say cook, when really it is just drying them out).

THE HOUSE.

First things first. Draw out your house on paper to give you shapes to cut around. You will need one template for the front and back, one template for the sides, one template for the roof and one template for the chimney (although this is optional).

Consider windows and doors etc. We have single windows on the side, a front door and a window on the front and then in the back this year we went for a large stained glass window.
The house needs to be thicker than the figures. Roll out to about 1 cm thickness, or there abouts.
Place your templates over the dough and cut out accordingly. When you cut out the windows cut the square you remove in half to create shutters you can place on the sides. When you cut out the door, keep it whole and you can stick it on separately and have it ajar.

For the stained glass windows place a boiled sweet in the empty space like so:

For the large stained glass window at the back, gently crush a few boiled sweets so you can get pieces about a sixth of the original. Obviously size isn't crucial, but you want them large enough for the colour to remain, and for them not to bleed into one.


Once you have baked each part (baking instructions are the same as the gingerbread men) you can assemble. Make sure the walls are as straight as can be, if things come out a little wonky, trim when they come straight out of the oven as they are still soft then.
Start with the walls first. Melt the caster sugar on a low heat until it becomes caramel. Do not be tempted to stir it, just let it melt down. It may become very dark over the course of assembling the house but you need not worry, just don't burn yourself! Dip the edge of the first wall into the caramel and place it so it fits behind the front panels. Repeat until all walls are stuck together. If your pan is not wide enough to fit both edges of the wall in simultaneously, use a spoon to generously spoon two thick lines onto the back wall you are going to stick them to. Stick the shutters on with the caramel also.

To fit the roof on gauge where the top walls meet the house and with a spoon, run two thick lines down each end of the roof panel and stick to the top.

Once it is finally assembled you can begin to stick on your decorations.
My dear sister who is currently in motion to take over the world she seems to excel in everything, was in charge of decorating this year, with some homemade candy canes.

Light decorations can be stuck on with icing sugar, and the sugar doubles up as a great replica for snow, just make sure you've made it thick enough. Things such as MnM's may need some of the caramel with which you stuck the house together with.


After all this, when you have assembled the characters and cotton wool that you wish to accompany the house, pop a tea light inside, stand back, and admire your hard work. This is really easy to do, just make sure you have thought about all the components. I highly recommend the templates and thinking about how everything is going to fit together.


Saturday, December 18, 2010

Don't Panic: Last Minute Gifts!

Christmas is looming. As many of us have not yet come close to finishing preparing, think about cooking your way through the rest of your shopping list. Homemade gifts are thoughtful and practical! Who doesn't want something they are going to use daily? I have included some of my favorite quick-and-easy gift ideas that don't include a large price tag. For other exciting gift ideas, Mel and I are going to be on HearSay with Cathy Lewis on the 22nd (this Wednesday) at noon EST!!!!! Listen on 89.5 FM in the Hampton Roads area or online at http://www.whro.org/home/html/liveradio/895.html.

Truffles
I know I have a truffle problem. It isn't healthy. If you are into white chocolate, try my recipe for White Chocolate Coconut Truffles or try this quick dark chocolate rum recipe. Who doesn't like booze and
chocolate? Please let me know because they need a serious attitude adjustment.

Grocery List:
-2 bars of good quality dark chocolate (about 1/2 lb), chopped
-2 Tbsp heavy cream
- 1 Tbsp u
nsalted butter
-2 Tbsp DARK rum (or liquor of your choice)
-unsweetened cocoa powder for dusting

Easy as Pie:
-
Melt the chocolate, heavy cream, and butter in a double boiler. If you don't have one, heat a pot with a little bit of water over the stove. Put a bowl over the pot (make sure the boiling water is not touching the bottom of the bowl or it will burn) and stir.
-Add rum. Stir
- Take the bowl off the heat, cover, and put in the fridge.
- Run ten miles as you wait for it to harden as they are one million calories each.
-when the mixture is hard enough to hold its shape, make little balls and immediately return to the fridge. They are so rich they melt pretty fast.
- when they are hard again, roll in cocoa powder (or whatever your heart desires).
- store in a cold place and wrap up in little packages!


Chocolate Chili Brownies
For something that will really blow their socks off, make Mel's chocolate chili brownies. Reminiscent of Mexican treats, these are perfect for foodies that love the out-of-the-ordinary. That's Caliente.

Infused Oil
Rather than gifting body oils give cooking oils. Lets face it, no one's significant other EVER gives them a massage anyways. Pick up some empty bottles with corks to fill. You can get cheap ones (craft stores, like Michaels, often have them) or you can get their fancier counterparts from antique stores or cooking stores. Remember to buy the olive oil from Costco or Sam's Club, if possible, as it is a lot cheaper in bulk. Here are some amazing infused oil ideas that will become a staple in your daily cooking:

CHILI OIL

Shelf life: 3 months
What you need:
  • 2.5 cups extra virgin olive oil
  • 5 small fresh red chilis
  • you can also add a couple cloves of garlic and peppercorns for extra zing.
Directions: fill the clean bottle with the oil and put in the chilis WHOLE. Cork and leave to infuse!
Uses: Drizzle over pizza, stir-frys, and use as a marinade with salt & pepper.

GARLIC OIL:
Shelf life: 3 months
What you need:
  • 25 garlic cloves, peeled
  • 4 cups of extra virgin olive oil
Directions: Heat the oil to a gentle simmer, add cloves and poach for 25 min. Leave to cool. Strain garlic cloves from oil and put into bottle. You can use the old garlic cloves to make a little garlic butter. Yum.
Uses: in salad dressings, on fish, vegetables, to dip bread in.

*
You can also infuse vinegars. Try rosemary, tarragon, or lemon and lime vinegars... infuse for three days and use within three months!

Homemade Condiments

MINT SAUCE
AMAZING on Roast Lamb! Use within three months!
Ingredients:
  • 1 large bunch mint
  • 7 Tbsp boiling water
  • 2/3 white wine vinegar
  • 6 tsp sugar
Directions:
  • Chop the mint
  • Cover with the boiling water to infuse
  • when lukewarm, add vinegar and sugar
  • Pour into a bottle and seal.. store in the fridge!

HONEY MUSTARD
Great on salads, chicken, and to dip your crunchy snacks in! This recipe makes 2 cups and it must be used within 4 weeks (refridge of course).
Ingredients:
  • 1 cup mustard seeds
  • 1 Tbsp ground cinnamon
  • 1/2 tsp ground ginger
  • 1 and 1/4 cups white wine vinegar
  • 6 Tbsp honey
  • salt & pepper
Directions:
  • Combine mustard seeds and spices.
  • cover with vinegar..soak overnight
  • put in bowl and use a pestle to grind into a paste (add honey slowly all the while).
  • add a little vinegar to thin if needed.
LEMON CURD
Makes 2 pints. Perfect on toast, scones, and try on a meringue with some fresh berries. Use within two months.
Ingredients:
  • 4 large lemons, unwaxed
  • 2 large lime, unwaxed
  • 3/4 cup UNSALTED butter
  • 2 cups granulated sugar
  • 4 large eggs, beaten
Directions:
  • Grate the rinds of all fruits.
  • Squeeze the juices strain their juices
  • Melt the butter in the micro.. add the lemon rind, juice, sugar, and eggs.
  • Cook on low heat for 25 min. STIR CONSTANTLY
  • Pour the curd into jars.
BASIL PESTO
Even if you didn't manage to make and freeze your pesto in summer for Christmas gifts, you can often get pretty good deals on fresh pesto this time of year. If you can only get your hands on a little bit of fresh basil make some flaky pesto curls for friends!


Sunday, December 12, 2010

All I Want for Christmas Is You!

Ok, so my rainy Sunday viewing of Love Actually and mass amounts of sugar have gone to my brain. All I hear in my mind right now is my friend Elana's voice repeating, "I hate Uncle Jamie" over and over in a very poor English accent. This sugar rush has come from the annual father/daughter German Christmas cookie baking session. It normally goes a little something like this:
Me: "Dad can we make Oma Flora's Spitzbuben (a traditional German cookie)?"
Dad: "Ok.. but how about I make them and you watch?"

So I stand there holding a spoon and pretend like I am helping (much like a 3 year old does). haha. The moral of the story is that these cookies take a lot of patience and German "precision" to make. They are; however, well worth the end result (says the helper). They are two almond cookies sandwiched together by red currant jam and covered in sugar. Straight out of the oven with a hot chocolate/mulled wine is when they are BEST. Believe me: Germans do know Christmas.


Oma Flora's Spitzbuben
makes about 24 cookies (12 when sandwiched together)

Ingredients
  • 300g, 2 and 3/4 cups flour
  • 180g, 3/4 cups unsalted butter, cold
  • 125g, 4.4oz unpeeled almonds
  • 150, 2/3cups granulated sugar
  • red currant jam
  • powdered or granulate sugar to roll cookies in
*Note: For the Americans, you can find red currant jam in most grocery stores (I got mine at Harris Teeter) but if worst comes to worst you can also use raspberry jam.

Directions
  • Use a food processor (or blender is need be) to pulverize almonds. You need them to be about a fine sand consistency.
  • In a large mixing bowl, cut the butter into slices.
  • Add the flour, sugar, and almonds.
  • Knead the dough (can do with a paddle in the mixer or by hand) until you get a ball. If you are doing it by hand, it takes ages and is a lot of work. If your arms aren't hurting, you aren't there yet. It is meant to be a flaky dough so no worries..
  • Pre-heat oven to 200 C
  • Let the dough sit for 30 mins in the fridge.
  • Take out dough, and roll it out on a floured surface in pieces (aka not all at once). It can be hard to work with so just be patient. Chose a cookie cutter without lots of little corners/details to make your life easier.
  • Put your cookies on a ungreased cookie sheet and bake until golden brown (about 7-10 min).
  • While still warm (not hot), carefully remove from cookie sheet, paint on jam, glue together, and roll in sugar.
  • Eat ASAP. They are best warm/when eaten within 24 hours(ish).

Perfect Bite: Pulled Pork Crostini w/ Cherry Sauce


As it is the holidays, I thought some small party nibble recipes were in order. Bite size food is an essential party of any cocktail party, as we all know empty tummies and loads of alcohol lead to an early end to an evening.. and no one wants that. Ideas for crostini toppers are endless (think caramelized onion and gorgonzola, tomato with mozzarella and balsamic reduction, etc) but my fav this season is pulled pork with cherry sauce. It is sweet, savory, meaty, and delicate all at the same time. Perfection.

Pulled Pork Crostini with Cherry Sauce
makes about 25-30 crostini

Ingredients:
  • 1 medium size pork tenderloin
  • salt & pepper
  • olive oil
  • 2 handfuls dried cherries (really cheap at Costco)
  • 1 cup red wine (any cheap stuff will do)
  • 2 Tbsp sugar
  • 2 sprigs fresh rosemary (one extra maybe for garnish)
  • 2 shallots, minced
  • 2 Tbsp butter
  • 2 french baguettes, cut thinly
* Note: You can, of course, use any cut of pork you like and cook accordingly. I know many would disapprove of shredding tenderloin (understandable) but I managed to get a really good deal. Feel free to use any cut around.. just make sure it is cooked to juicy perfection.

Directions:

for the pork:
  • Preheat oven to 425F/220C
  • Pour a glug of olive oil in a frying pan over high heat. Sear pork tenderloin on all sides.. make sure it has a nice brown color on all sides.
  • move the frying pan to the oven and cook pork tenderloin for about 20 min (or if you have a meat thermometer, get it to 155F/68C).
  • remove from oven and let it rest
  • while the pork is in the oven, make the sauce.
  • When the sauce is complete, shred pork and season well.
For the sauce:
  • Add chopped shallots, butter, and rosemary to a small saucepan on medium heat. Sweat shallots until glossy.
  • Add cherries.. cook two minutes.
  • Add wine and sugar and cook for about 3 min.
  • Add salt, pepper, and maybe a tad more sugar according to taste.
  • Remove from heat and let it cool.
  • When cool, remove rosemary sprigs and pulverize in a food processor or blender until smooth.
  • You can return to heat if desired or serve it cold.
For the crostini:
  • Take your thin slices of baguette and brush with thin coat of olive oil on both sides
  • season
  • pop into a hot oven until crispy (about 5-7 min).
  • This can be done the day before!! Plan ahead people.
Assembly:
  • This part is easy.. a small heap of pork on every crostini, top with sauce (however much you want), and decorate with some fresh rosemary if you have.

Wednesday, December 8, 2010

Mama D's Pâté


The time has come my special friends to share my mother's MOST famous recipe. Her pâté is always a staple at our family boozey Christmas party and is the glue in her magnifique beef wellington. I know the concept of pâté is not the most appealing to some but I assure if you put aside your misgivings about liver, fireworks will go off in your mouth.

This recipe is so simple and CHEAP. It tastes like a million bucks and costs about $10 to make. The best way to enjoy this treat is on a crostini with maybe some walnuts, figs, and blue cheese on the plate.

Heather's Chicken Liver
Pâté

MAKES A LOT.. enough for 100 crostini (easy)..

Ingredients:

  • 4 Tbsp butter
  • 1 lb/450 g chicken livers
  • 7 rashers bacon (streaky), chopped
  • 2 small onions, chopped
  • 1/4 Tbsp thyme (fresh, chopped preferable)
  • 2 small bay leaves (or one large)
  • 3 Tbsp Dry Sherry
  • heavy cream (get a small tub.. will use to add in food processor until smooth)
  • salt & pepper
  • 4 Tbsp clarified butter for top (optional), warm
Directions:
  • Strain livers and rinse with water. Gross, I know, but just think of it as a science experiment.
  • For this recipe you can use a large pot or... if you have one, a wok works wonders. Put over med/high heat.
  • toss in the bacon, onions, thyme, bay leaves, and butter and cook till all of the fat is out of the bacon (about 4 min).
  • Throw in the chicken livers and cook 2 min.
  • Add the sherry and continue to cook until liver is done. (about 10 min)
  • When finished, let the mixture cool (you can put it in the fridge). Do NOT put it in the food processor when hot.
  • When the mixture is ready, put it in the food processor in batches. You can use a blender if you don't have an fp. Add a little bit of heavy cream to loosen.. you don't want it too runny but it should have a creamy texture. Use your discretion.
  • Add salt and pepper to taste
  • To serve, there are a couple of options: you can put it in a jar (like above without butter), or you can serve in ramekins (or a serving dish) with a coated butter top. If you are just putting it in a dish to serve, remove from the food processor and transfer it into the desired dish and refrigerate. If you want a butter topping, distribute into ramekins (or whatever you want) and refrigerate for an hour. Take out and pour a coating of melted clarified butter over the top. I like to also add some sage leaves for decoration. Return to the fridge until butter is hardened. enjoy!!
Lesson: How to Clarify Butter

Clarifying butter is easy, but time consuming. The process of clarifying is simply removing milk solids and the water content from butter. You are left with the fat/oil that can be heated to a high heat without burning (ie it is perfect substitute for oil).

You can often buy tubs of clarified butter in British supermarkets and some American ones. To clarify your own you must have patience like the karate kid and follow the master's directions. You have to clarify a lot of butter at once but, thankfully it keeps for about two weeks in a sealed container in the fridge.

Step One:
Heat butter ( I would recommend at least three sticks at a time) on a low heat in a pot. You must NOT, under any circumstances, stir, touch or play with the butter as it melts. Let it do its thing.

Step Two:
When it has melted you will start to see white stuff rise to the top. Simply, skim this substance off as and when it comes until you have a clear oily substance left. That, my friends, is the clarified butter.

Tuesday, December 7, 2010

Heres to a sloey Christmas

As I am a novice to this drink, I - like fellow novices - am very proud of what I have created thus far. True, it hasn't been sampled and I must wait another twenty days before it can be tasted, but I thought you would like to see what it is I am so excited about come 27th December.

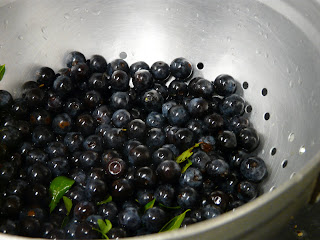
These are the lovely sloes having just been picked and ready to be pricked. I said they looked like blueberries did I not?


Once bottled, they don't make for the most appetizing drink I can think of, but even after a few days the colour starts to permeate into the gin and soon enough it will start looking like...


Yes, that is a Christmas tree, I can't help it, we had snow early this year and it was all I could do to wait until the 4th December to buy one. I have also been given (and opened) my first Christmas present, which happened to contain a recipe for sloe gin jelly. I can promise an attempt at that one in the new year. As you can see, the purple is taking hold and it is beginning to look like something you would want to drink. I am most pleased, if only for the fact I have something pretty.